Your Body’s Most Powerful Primal Muscle (You’ve Never Heard Of)!
I bet you can’t guess which muscle in your body is the #1 muscle that eliminates joint and back pain, anxiety and looking fat.
This “hidden survival muscle” in your body will boost your energy levels, immune system, sexual function, strength and athletic performance when unlocked.
If this “hidden” most powerful primal muscle is healthy, we are healthy.
Your Arms and Abs Will Transform After This 2-Week Challenge Image Source: POPSUGAR Photography
← Use Arrows Keys →
Plank is one of the most effective total-body moves, so here's a new challenge for you to conquer — a five-minute plank. Since holding a straight-up plank wouldn't be any fun (and could end up causing an injury), this challenge mixes up five basic variations to not only tone your abs and arms, but to target the obliques, legs, and upper back as well. Here's an explanation of how to do each one, followed by the two-week plan.
Original article and pictures take media1.popsugar-assets.com site
You'll Want to Unroll Your Mat For This Happy Hips Yoga Sequence
Runners and the deskbound, rejoice! Your tight hips will soon feel more open and relaxed. Just step onto your yoga mat or even the floor next to your computer and move through this 16-pose, hip-opening sequence.
Original article and pictures take media1.popsugar-assets.com site
You’ll Love This Weighted Yoga Flow Even If You’re Not a ‘Yoga Person’
Yoga is a fitness discipline centered around physical, mental and spiritual poses. Studies have shown that yoga squashes stress, aids weight loss, eases pain, helps people stick to an exercise routine, and even improves running times. The strength and flexibility developed on the mat—namely in the core, quads, hamstrings, and hip flexors—can help you run more efficiently and stay injury-free.
Additionally, holding challenging poses builds tenacity that’ll pay off on the road. Yoga poses give runners more than just foot strength, they can help build mental endurance.
How to start practicing yoga
Time it right - Your yoga practice should have a converse relationship with your training: When you’re ramping up mileage and churning out hard workouts, stick with relaxing sessions. When your training eases up, you can increase the intensity and frequency of your yoga workouts, says Sage Rountree, yoga instructor, triathlon coach, and author of The Runner’s Guide to Yoga. If you take on a rigorous practice in the midst of a monster training month, “you’ll interfere with your body’s recovery and risk hurting yourself,” Rountree says.
Be humble - It can take years to master yoga poses, so don’t go to your first class (or your first 20) expecting to be the star pupil--no matter how many races you’ve run or how fast your PRs are. “Focus on yourself, not what the person on the mat next to you can do,” Rountree says. And realize there’s plenty to gain from a less-than-perfect practice.
Avoid injury - Runners’ high pain thresholds coupled with their competitive natures can make them more prone to injury. Rountree sees this in her own classes. If you have a troublesome or tight spot you’d like to target, talk to your instructor about ways to modify poses so you can get a gentle—and safe—stretch.
Original article and pictures take www.runnersworld.com site
Chronically tight hips not only can make certain yoga poses difficult to execute, they can also cause chronic discomfort. Although the reason varies, most people lack hip mobility because of sedentary lifestyles, past injuries or scar tissue from surgeries. Furthermore, according to certain yoga lineages, the hips are the storage center for unresolved emotions; therefore, ancient yogis believed stress and unsteady emotions manifest within the pelvic bowl, resulting in tight, stiff and immobile hip musculature.
Thanks to its elevated surface, using the BOSU for yoga hip openers allows you to stretch and perform asanas with ease. Also, the BOSU assists in bringing awareness to poses because you must engage the core to stay steady on top of the unstable surface.
If you desire more advanced, or deeper, hip openers, the elevated surface of the BOSU also allows you to deepen your practice. Therefore, the BOSU is ideal for anyone who desires an easier or more challenged practice. The poses in the following hip-opening routine should be performed in order, and each pose should be held for 30 to 60 seconds. Complete the routine with the right leg coming forward, and then repeat with the left leg forward.
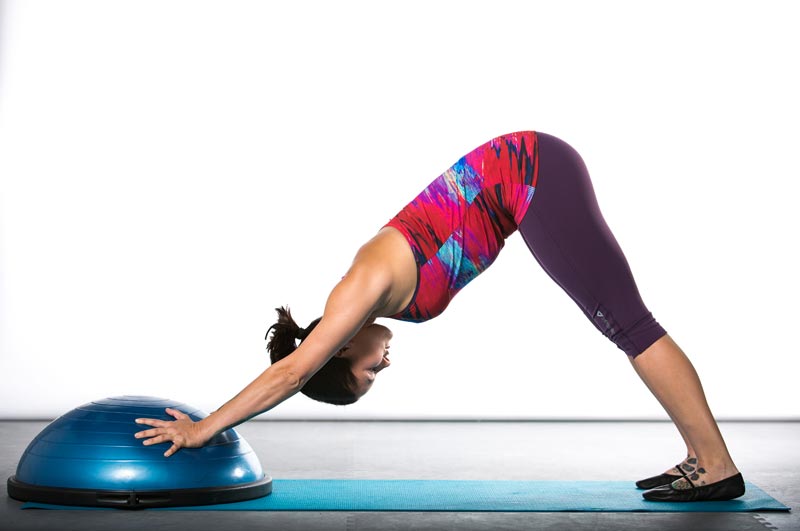
Downward Facing Dog
Downward facing dog promotes openness in the back of the legs. Placing your hands on the BOSU helps facilitate proper alignment in the torso, avoiding kyphosis, which many people experience. The elevation allows the heels to be firm on the ground.
How to Perform: Stand behind the BOSU and place the hands 2 to 3 inches in front the center bullseye. Keep hands shoulder-width apart. Walk the feet back and lift the hips into the air. Relax the chest and heels and focus on breathing in the front and back of the chest.
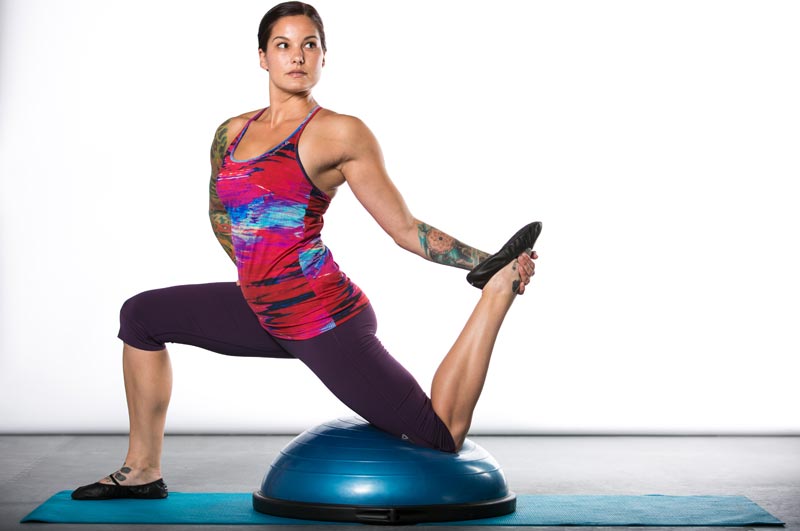
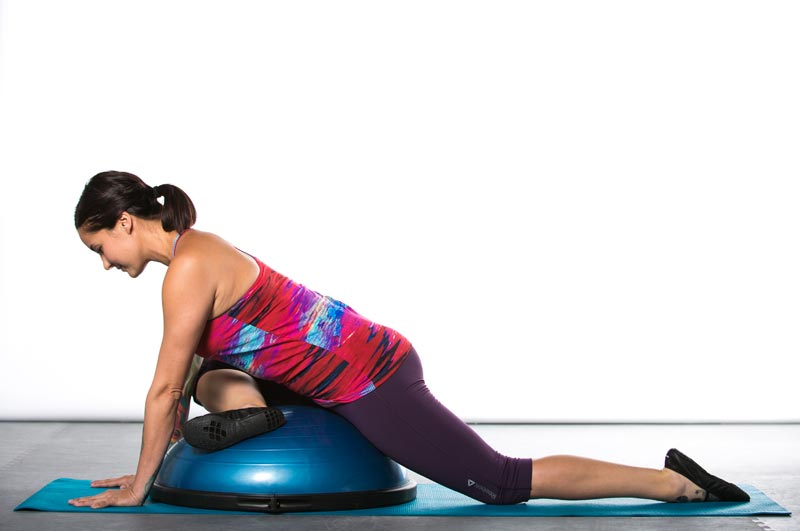
Low Lunge Variation
This lunge allows the body to deeply lengthen the hip flexors. Those who perform the more advanced version will find a deeper openness into the quadriceps, chest and shoulder. The BOSU allows for the back leg to open without force and makes this pose achievable for those with balance and knee issues.
How to Perform: From downward facing dog, transition the body into a plank and step the right foot forward, in front of the BOSU. Place the left knee on the dome and position the right ankle under the knee. Lunge forward toward the front leg to open a point to where the front left hip opens. To progress the exercise, bend the left knee and with the left hand reach for the left foot or ankle. The right hand can be placed on the hip to support balance.
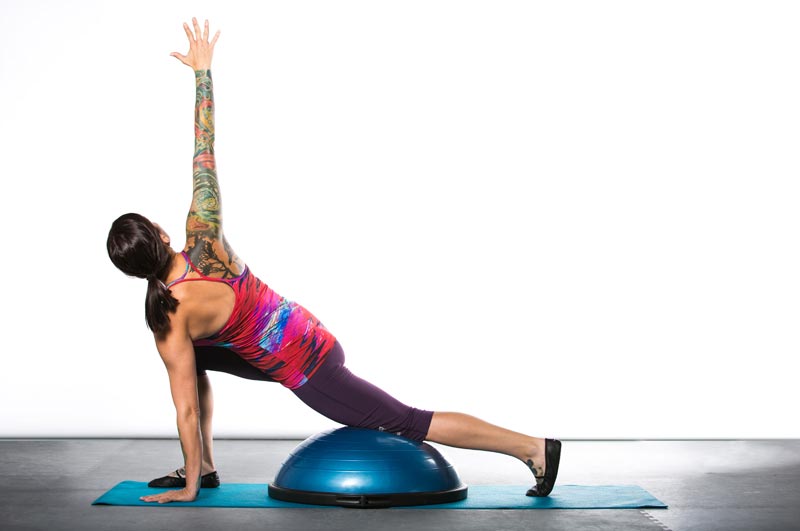
Revolved Side Angle Pose
This pose allows the lateral part of the hip and external rotators to open, while also improving thoracic mobility. The BOSU assists the transition between poses, promoting better movement and balance. The BOSU allows someone to reach for the floor with more confidence as the dome is supporting the body’s weight.
How to Perform: Maintain the low lunge position from the previous pose. Place the left hand on the floor and rotate the chest toward the inner thigh. Reach the right arm over the shoulder and breathe deeply into the right open space of the rib cage.
Pigeon
Pigeon externally rotates the leg, which lengthens the external rotators, piriformis and hamstrings. The BOSU supports the pelvis in a neutral position. On the ground, this is a challenging task for those with chronically tight hips. For those with limited flexibility, pigeon pose is sometimes unachievable with a cushioned support. The BOSU, however, meets the hips halfway.
How to Perform: From revolved side angle pose, lift the body upward and back to lay the right shin and hip on the BOSU. The shin will go slightly in front of the bullseye and the hip will lie behind the bullseye. Extend the left leg behind and rest the knee on the floor for support. For a deeper pigeon, rest the torso forward without applying weight on the front leg.
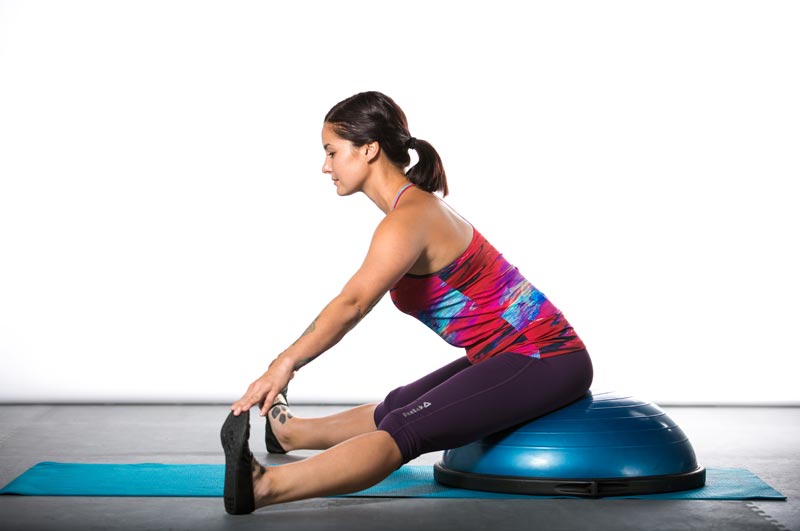
Seated Forward Straddle
This pose lengthens the muscles on the back of the legs and the gracilis of the inner thigh. When performing this exercise on the ground, people with tight hips often curve from the spine rather than hinge from the hip. The elevated surface brings awareness to hinging from the hips and allows the stretch to be more achievable.
How to Perform: Sit on top of the dome, with the hips directly on top, or about 3 inches in front of the bullseye. Place the legs into a “V” position while keeping the feet flexed. Keep the chest upright and hinge forward from the hips. Hold to the point where you feel a stretch.
Butterfly
Butterfly is known for externally rotating the hips and deeply opening the inner thighs. For those with tight hips and upper backs, butterfly on the ground may curve the spine and hike the legs upward. The BOSU’s elevated surface enables the legs to open in a comfortable, non-invasive manner. The wider the knees, the more the gracilis lengthens.
How to Perform: Sit on top of the dome with the knees bent. Allow the knees to gently open to the sides while you keep the feet together. Keep the spine neutral and allow the legs to relax to the side. To increase the depth of the stretch, hinge forward while maintaining a neutral spine.
Original article and pictures take www.acefitness.org site
Many of us suffer from tight hips and hamstrings. This sequence of yoga poses will work to loosen up your muscles and stretch out those extremely tight areas. It is said that we hold a lot of negative energy in our hips and hamstrings. Opening up these areas is a great way to release that negativity. This will help to uplift your body, mind and spirit.
This post contains some affiliate links
Benefits of Stretching Your Hips & Hamstrings
Decrease Risk For Injury
Yoga that stretches out your hips and hamstrings helps to decrease the risk of injury, especially for runners and other athletes. When these areas of our body are opened it decreases strain on other areas of your body, especially the back and knees.
Decrease Aches & Pains
A common source of lower back pain is from tight hamstrings. Work on stretching out these areas daily. If you are consistent with your practice you will notice how your aches and pains gradually begin to disappear.
Improved Posture
Many of us unfortunately spend most of our day sitting. This leads to tight joints and muscles, and contributes to poor posture. Yoga works wonders for improving both flexibility and the strength of your postural muscles. This will allow you to both sit and stand taller with improved posture.
Yoga Sequence For Tight Hips & Hamstrings
Here are some great hip openers and hamstring stretching yoga poses that you can try. Try to hold each pose for about a minute or two to allow your muscles to release. Don’t forget to really breathe into the pose. If you feel that you cannot breathe while in any of the poses, then that is a sign that you need to pull back. Listen to your body and do what feels good for you. The point of these poses are to make you feel good, not strained. Just be patient and over time you will begin to see how your body will release and become more flexible.
FYI: Many of these poses are one sided, so don’t forget to repeat the pose on the other side.
Crescent Lunge
Reach your arms up with your shoulders relaxed. Step the back leg out behind you. Bend the front leg so that your knee is right on top of your ankle. Be sure that your knee does not bend forward over the ankle, as this will put strain on your knee. If you are having trouble balancing, move your back leg out to the side, away from your body to widen your stance. Keep your hips and pelvis level and squared off to the front of your mat.
Warrior II
Keep your front knee stacked right on top of your front foot. Take your back leg and turn your foot to the side. The middle of your back foot should be in line with the heel of your front foot. Keep your hips and pelvis leveled and facing to the side of your mat. Arms are out wide with your shoulders relaxed. Gaze right out over the middle finger of your front hand.
Reverse Warrior
From your warrior II posture, reach your front arm over your head and reach your back arm down your back leg. You will feel this stretch not only in your hips but up your side body as well.
Triangle Pose
From your warrior II posture, reach your front arm down so that your front hand is in line with the middle of your front foot. If this puts too much strain of your body, try placing a yoga block right in the middle of your front foot and reach down for that. Your back arm will reach straight up to the sky. For more of a balance challenge, turn your head to look up at your top hand.
Runner’s Lunge
Front knee is bent and stacked right on top of your front ankle. Your back leg stretches out long behind you. Both arms are placed on the inside of your front leg. If this stretch is too much, try bending the back leg so that it is resting on the mat.
Lizard Pose
Stay in your runner’s lunge, but allow that top knee and foot to fall away from your body. You will feel a nice stretch in your hip when you do this. If you need more of a stretch, bend your arms and rest your body onto your forearms. If you want to make the stretch easier, you can bend your back leg to rest on the mat and/or place your hands on a yoga block.
Pigeon
Bring your front leg into a 90 degree angle in front of you. Try to keep this angle as much as possible as you reach your back leg out towards the back of the mat. Keep your hips level and facing toward the top of the mat as much as possible. You may want to place a yoga block under that front hip if you are having trouble keeping your hips in line. For a deeper stretch, bend forward to rest on your forearms.
Figure 4
This is a modification for the pigeon posture. Start by laying on your back. Place your right ankle on top of your left knee. Bend that left leg up to a 90 degree angle. Keep your right foot flexed to protect your knee. Reach your arms through your legs (underneath that top leg) to grab onto the back of your left leg. For a deeper stretch press your right foot against your left leg as you use your arms to pull the left leg forward. Repeat on the other side.
Double Pigeon
From your pigeon posture, swing your back leg forward and stack it right on top of your front leg, keeping both legs at a 90 degree angle. Keep both sides of your seat planted firmly on the mat. For a deeper stretch you can press down on the top leg or reach forward with both arms. I find that this stretch is difficult when you are first starting out. As you can tell from the picture, I still cannot stretch my top leg all the way down to meet my bottom leg. Be patient with this stretch and don’t push your body too far.
Bound Angle Pose AKA Butterfly
Bend both knees out to the side and place the bottoms of both feet together. Reach your legs out to the side as much as your body allows. For a deeper stretch, fold the top of your body forward over your legs.
Reclined Bound Angle Pose
From your butterfly posture, lower your upper body back on to the mat. Keep the bottoms of your feet glued together and allow your knees to fall out to the side. This is a very nice restorative posture. You can stay here as long as you’d like, allowing yourself to breathe into the stretch.
Reverse Butterfly
Lay on your back. Cross your legs. Bring your legs up toward the sky. Grab on to your shins or ankles and stretch your legs gently up and in the opposite directions. Repeat on both sides.
Bridge Pose
Lay on your back. Plant your feet hip width apart, right under your knees. Push off of your feet and lift your hips up toward the sky.
Happy Baby
Lay on your back. Bend your legs, bringing your knees up towards your chest. Grab onto the outsides of your feet and gently stretch your hips out. It also feels good to rock your body side to side while in this posture.
Frog Pose
Frog pose is like a middle split with your knees bent. Both knees are bent in at a 90 degree angle with your feet flexed out. Your knees, thighs and seat are all in one straight line. Think of your lower half as being in a goal post position, where your upper body is the base of the pole. Bend forward and rest the top of your body on your forearms.
Mermaid Pose
Bend your top leg into your body. Bend your back leg up towards the sky. You can either grab onto your back foot to pull it up or place it in the crevice of your arm. As you become more flexible in this position you can practice reaching your front arm back to bind it with your arm that’s hooked onto your leg. Try to keep your hips as level and squared to front as possible. For a deep stretch, try to keep that front leg at a complete 90 degree angle, like you would have it in the pigeon pose.
Upward Facing Dog
Lay on your stomach with your leg out long toward the back of the mat. Keep your thighs, shins and the tops of your feet facing down toward the mat. Place your hands right underneath your underarm area. Use your arms to lift your upper body, chest high and open, back extended. Try to relax your shoulder down your back.
Downward Facing Dog
From your upward facing dog, curl the toes under moving through a plank position and then into your downward facing dog. Your seat is lifted high up towards the sky. Spread your fingers out wide on your mat. Extend your shoulders, while keeping your core engaged and your back in a neutral position. Your legs are extended straight as you try to push your heels toward the ground.
Rag Doll
From your down dog, walk your hands in towards your feet. This moves you into your forward fold. Be sure that you are bending forward from your hips, and not your back. Allow your upper body to hang heavy. Fold your arms together and gently sway your upper body side to side.
Forward Fold
For a deeper hamstring stretch, reach your hands all the way down to your mat. You can either grab onto your big toes with two fingers or slide your hands underneath your feet.
Wide Legged Forward Fold
To move into a wide legged forward fold, step your feet wide apart on your mat. Be sure that both of your feet are facing forward. With a straight back, gently fold forward. Lower your head towards the floor and place your hands on the matt. For a deeper stretch, wrap your hands around the back of your ankles to pull your body into the stretch a little bit more. Try to get your forehead as close to the mat as possible.
If you are consistent with your Yoga practice you will begin to notice a major change in your body. Yoga has so many health benefits, both physically and mentally. I hope this sequence helps to open up your hips, stretch out your hamstrings, improve your posture, release negative energy and to prevent injuries. A little bit of Yoga truly does go a long way in improving your activities of daily living.
If you suffer from neck or back pain, you can check out this post for another great yoga sequence.
Yoga Questions Answered Pin it! Ask your yoga questions on twitter using hashtag #yogaquestion, on the yogabycandace Facebook wall, or submit your question here.
What should I do about my hyper-mobile hip joints?
Question 1: I have hyper-mobile hips, and as a result the joints are rather unstable. Balancing on one leg is very difficult for me, though I have no problem with arm balances. I know that continuing to strengthen the muscles around the joints will be beneficial, but are there any poses in particular that would help improve hip joint stability and balance?
Answer 1: People with hyper-mobile joints almost have it more difficult than those without because they are usually able to do all the athletic poses without too much effort, but the problem is that the hyper-mobile joints can cause injury. The challenge, then, for these people, is to tune in to the subtle body. No matter what pose you're in, scan your body beginning with the foundation, which is usually the feet. Always visualize a suction in the middle of the feet. This helps to engage the muscles and from there it's kind of a domino effect. The ankles will activate, the calf muscles, the thighs, the pelvic floor with lift, the abdominals will engage, etc. Follow the muscles up your body as you mentally scan and try to keep things light and lifted and engaged. For the joints where you're hyper-mobile, try to keep a little micro bend, and avoid locking the joints.
Like you said, it's really important to strengthen the muscles around the joints, and there are definitely yoga poses that will help like this sequence for legs and butt , and this sequence is great for improving balance. But the most beneficial thing, in my opinion, is tuning into the more subtle aspects of the practice as outlined above.
Pin it! Pincha mayurasana (forearm stand)
How do I know when to take my practice to the next level?
Question 2: Hi there! I'm unsure of how to know if it's time to take my practice to the next level or not. I'd like to eventually have a daily practice and maybe even teach someday. Lately I have been going to a mixed level class every other day and in that class I have been trying to do the "challenging" variation of the pose if the instructor gives the option. I've been feeling good about it, and I am wondering if I should try going to the Yoga 1 class or the Power Vinyasa that is offered. I know that I should of course, listen to my body - I also know that I have no background in sports or such; because of that I'm not sure what qualifies as "pushing myself" or what is normal when one is trying to go deeper into a practice. I occasionally get a good shaking in my muscles as I hold a pose, but I've yet to experience the 'sweat to the point where I'm worried about slipping' as I have read about from some yoga people out there - does that mean I'm not pushing myself enough? Thanks so much for lending out your experience and insight to all of us! And for this beautiful and inspiring blog.
Answer 2: In order to move deeper, especially in a more athletic yoga practice, it's important to find your edge. It doesn't matter how much you sweat (some of us don't sweat much no matter how hard we work). Instead, what really matters is how the body feels. "The edge" is that sweet spot between the known and unknown. That sounds sort of flowery and vague so let me break it down. Imagine you're working on side crow pose. People new to the pose can keep the knees bent. People who have a stronger core and are ready to take it deeper can try straightening the legs. But how do you know when you're ready to do that? You know when the beginner version is second nature. When you know the pose inside and out. So you find your edge by moving your feet a little bit and beginning to straighten the legs. So my suggestion to you is to find your edge. If you feel comfortable in the classes you're in and there is an option for a more challenging class, give it a try. The very fact that you're doing all this introspective work and trying to figure out what's best means you're already on the right path. :)
Pin it! Supported bridge pose - a great restorative pose
What poses should I do to stretch my stomach, keeping in mind that I have lordosis (swayback)?
Question 3: I have swayback (lordosis) and some yoga moves are very bad for that. I have just been diagnosed with stage 3 endometriosis which means I have adhesions as well as the endo spots. I had removal surgery in January, and now I am starting to feel the pains of the internal scars and adhesions being built back up. I have found there are yoga poses that help stretch the stomach area to expand and hopefully break up the scar tissue. The only problem is some of the poses make the swayback worse. Can you please tell me which ones would be gentle enough for both of my problems? Thank you so very much.
Answer 3: I think you might benefit from low lunge, gently pressing the pelvis forward (look at the first picture), and supported bridge post shown above. You'll need a yoga block for supported bridge pose. Place the block directly underneath the back of the pelvis so your tail bone is long.No matter what yoga pose you do, keep the alignment of the pelvis in mind. For lordosis, the pelvis is tilted forward, so visualize the tailbone lengthening down toward the heels of the feet. This will lengthen the low back, bringing it more into a long line rather than a backward letter C. Hope that helps you!
My hips cramp up when I do boat pose, what should I do?
Question 4: I love reading your blog - thank you for sharing :) I do yoga at home somewhere between 1 and 4 hours a week. I also run around 30 km a week, and I have tight hips and hamstrings. I find that I tend to get cramps in my hips, when I do poses that require strength there (especially boat pose). A lot of the poses that work the abdominals make my hips cramp. I don´t consider my hips very tight, I think my real problem area is the hamstrings. I enjoy all the poses that stretch the hips. And I have spent a lot of energy on variations of bridge pose to strengthen the pelvic floor (three child births, only one went easily), which I think has improved my strength in that area. Do you have any advice on how to avoid this cramping in the hip during poses like boat or build up more strength in the area?
Answer 4: Hmm, if you're cramping in the hip flexor in boat pose and other poses that work the abdominals, I think it might be worth looking into strengthening the hip flexors and lower abdominals. Above are two poses you can try. Breathe 5-7 breaths in each pose, and try not to lean back as you do them. Try to engage the core and use the strength of the abdominals and the hip flexors to left the leg. For working on core strength, I have a yoga for sculpted abs video, and if you're pressed for time you could try the (less than) 5 minute abs video. Until you build up the strength in the core and hip flexors, you can modify the boat pose by extending just one leg and keeping the toes of the other foot on the ground.